How to Lay Outdoor Tiles

Getting your garden ready for summer? If you have the space, a tiled patio is perfect for barbecuing, entertaining or simply chilling in the sun. It also makes a stylish design feature, tying your space together and giving your garden the refresh that it needs. Whether you are retiling an old, worn patio or laying a brand new one, our below guide will show you how to lay outdoor tiles correctly (however, we also recommend talking to a professional before you begin any tiling).
What tiles are suitable for outdoor use?
We recommend using a porcelain tile outdoors. Porcelain is extremely strong and hardwearing and is resistant to fading, fluctuations in temperature, frost and moisture.
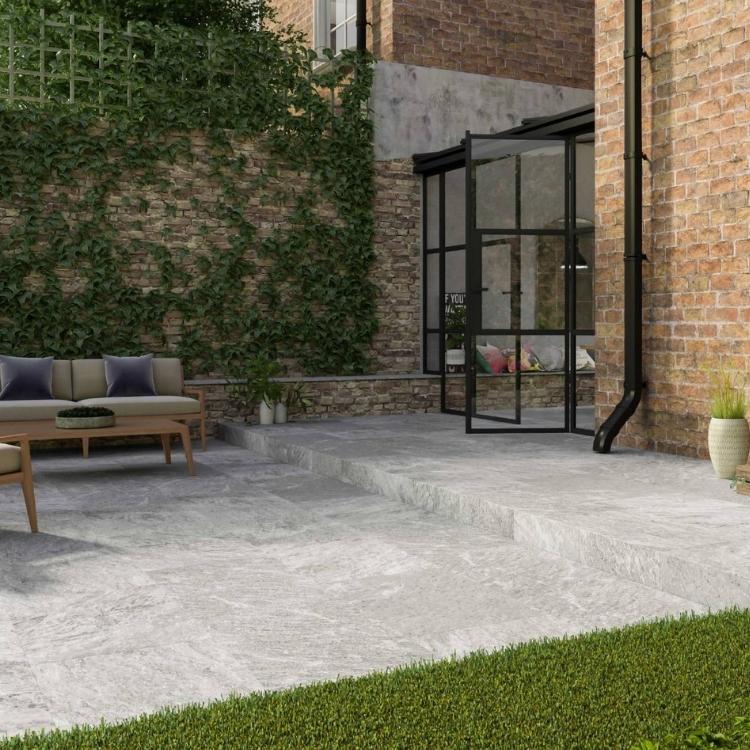
Made from high-grade porcelain, our Stonehenge Grey Tile is perfect for outdoor use. These durable, quality tiles are perfect for high-traffic areas. They are also very easy to maintain and have a quick-wipe surface, so you don’t have to worry about spills or dirt.
With its natural stone effect finish, rustic speckles and veining throughout, this elegant tile has an authentic, organic look without the cost and upkeep of the real thing. The delicate patterning and light grey finish makes it the perfect minimalist backdrop to a new garden project and looks great in both traditional and contemporary spaces.

Before you get started…
Make sure you have the right protective equipment before you start doing any work with your outdoor porcelain tiles. Always wear thick gloves and hard footwear, especially if you need to cut any tiles. Handle your tiles carefully to prevent chips and breakages and if necessary, get someone else to help you lift them in place to avoid back injury.
Tiling over an existing patio?
If redoing an old patio, you will need to remove the existing tiles first. If the tiles are very old, you should be able to pop them off using a ¾-inch flat chipping chisel. Or, the quickest way of removing any tiles is to hire a cordless rotary chipping hammer. You will also need to remove any old adhesive and grout before laying your new tiles. The fastest way to do this is with a wide chisel, tapping towards the material. When removing old tiles and product, make sure to do it slowly and carefully while wearing safety goggles and gloves.
Measure the area
The first step in laying your new outdoor tiles is to mark out the area to be tiled with posts and string. This helps you plan your layout and calculate how many tiles you need. Measure the length and width of the area and multiply these together to calculate the square meterage. If the area is not a straightforward square or rectangle, break each area down into smaller rectangles, calculate the square meterage of each, then add these values together to get the total.
Once you know your measurements, you can figure out how many tiles you need. Use our handy Tile Calculator to help you with this. Make sure you add 10% extra tiles to your total to allow for cuts and wastage.
Prepare your subfloor
Before you begin tiling, you will need to prepare the ground underneath. This provides a solid base on which to lay your tiles.
- First, dig out the area to a depth of around 150-200mm. Digging to this depth ensures a base that adequately supports your tiles and any loads that will be placed on them, e.g. garden furniture. The dug-out area should also have a slight slope to allow for drainage. If you're tiling up to the edge of a house or wall, this slope should run away from the structure to avoid water pooling.
- Next, fill the area with hardcore (gravel and crushed hard rock) to a depth of 100-150mm and use a garden rake to distribute it evenly. Compress the hardcore using a whacker power plate to create an even, compact subfloor; make sure you maintain the slight slope throughout the process by using a long spirit level.
Before continuing to the next step, ensure the subfloor is dry, smooth and free of debris, efflorescence, laitance and any other barriers.
Apply your adhesive
All our Tile Adhesive is suitable for outdoor use and is frost and water-resistant once set. Apply your chosen adhesive to the dry subfloor in areas of up to 1 sqm. For larger tiles, you should also spread a thin layer of adhesive to each tile with a trowel just before they are placed.
Now, lay your tiles
Starting in a corner, firmly place the first tile into position with a twisting and sliding action. Use a rubber mallet and spirit level to secure the tiles and maintain the gradual slope for drainage. Continue laying the tiles in this way, leaving a 3-5mm gap between each one for grout. Use a sponge and water to clean away any adhesive as you go; if this is left to dry, it will be very difficult to remove without damaging the tiles.

Get Grouting
Since they will be exposed to the elements, it’s important to grout outdoor tiles. Grouting will seal off the gaps between your tiles and help to prevent the build-up of dirt and damage from harsh weather conditions. Before grouting, make sure your adhesive has completely dried and cured. This usually takes about 24-48 hours, but thick layers of adhesive and lower temperatures will increase the drying time. You should also select a grout designed for outdoor use; at Tileshack, all our Grouts are suitable for exteriors.
- Working in small areas, hold a grout float at a 45° angle and apply the grout between the tiles, ensuring all joints between the tiles are filled.
- Once all the joints are grouted, leave to dry for approx. 10-15 minutes, then wipe the tiled surface with a damp sponge without putting too much pressure on the joints. Make sure you don’t over wash the tiles either; if one wipe down doesn’t to get rid of all the grout residue, give it a second clean without adding too much water all at once.
- When the grout has hardened for about an hour, drag a small grout finisher across the joints at a 45° angle to smooth off the grout and remove any excess. Using a clean cloth, polish down the tiles until completely clean.

After following the above steps, you are free to enjoy the results of your work for the summer! If you need further advice on laying outdoor tiles this season, pay a visit to one of our showrooms on the island of Ireland. Our amazing team are on hand to help you with any tips and recommendations you need. You can also Request a Callback from the comfort of your own home; our Customer Service team will be happy to guide through your Tileshack journey.